Tooth bonding is one of the cheapest and easiest cosmetic dental procedure.
The process of tooth bonding makes use of an enamel-like resin material that is not porcelain. This product, although not as strong as porcelain, as it can fracture easily, has been used for over 20 years. This technique has been used for small front fillings, to repair chips in teeth and to improve the appearance of teeth. This procedure is also used to close spaces between your teeth and to make the tooth look longer. As such, tooth bonding is meant to change the color or shape of multiple teeth, but can be used to repair a tooth’s color or shape. It can also be used as an alternative to flings or to protect a part of the tooth’s root that has been exposed due to gum recession.
Tooth bonding allows for minimal tooth preparation, which means almost none of the enamel is removed such as in the veneering method. Tooth bonding can also be completed in a singular dentist’s visit.
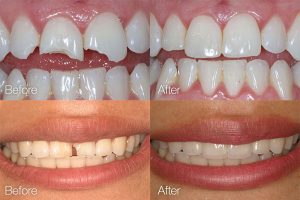
Before and after images the application of the bonding technique
The procedure involved in a tooth bonding
Firstly, your dentist will take an x-ray of your teeth and gums. After a consultation, and to discuss if this treatment is the best solution for you, whereby other treatments such as crowns, veneers and on-lays will be discussed, then dentist will go ahead.
Then the dentist will select the shade to match your own tooth. Thereafter, all possible debris is cleaned off the tooth.
Then the dentist will start to prepare the tooth. Depending on the specific restoration that is called for, the dentist might shape the tooth, or they might not trim the tooth at all. The dentist will drill if there are any tooth decay and correct it, before continuing.
After addressing all the issues with the tooth, the dentist will apply an acidic tooth conditioner. This gel comes in a small syringe and contains 30 to 40 % phosphoric acid. The gel is spread out over the tooth where the bonding will occur. The dentist will allow the gel to rest for 15 seconds or longer before washing it off. Your dentist has now completed the preparation of the tooth and can now start the bonding process.
After the tooth is ready, the dentist will apply a tooth colored plastic putty called composite resin and then they will shape it to fill in chips or to correct other problems.
Thereafter, the resin is exposed to 20 to 60 seconds of bonding light, which will dry it. Your dentist might also make use of a laser to dry the tooth that has been treated. Either way this action will not just dry the resin but will also harden it. Then your dentist will smooth and polish your teeth.
The dentist applies the resin in repeat layers. This is since a thick layer will not allow the light to penetrate and allow the resin to cure. Another reason why multiple thin layers are preferred is as on a microscopic level the resin shrinks. By applying thin layers over each other, allow the distortion to be limited to a minimum.
The whole procedure will normally take the dentist around 30 minutes to an hour to do. If there are more teeth that needs to be treated, then you might need to schedule more time or add in other visit.
Recovering time
Teeth bonding does not need anesthesia, as such, there is no down time from such a procedure. However, if a local anesthesia was used, this will normally wear off within an hour or two.
Complications and other factors you should be aware of
Although tooth bonding is an easy and cost-effective process, with minimum impact on your own enamel, the life span of the product is limited to around a year. Besides that, the material is not as strong as porcelain, biting and chewing on pens can lead to chips forming. Tooth bonding is a temporary correction of cosmetic defects. As this procedure has limitations, it is more for small cosmetic changes.
Certain liquid drinks, like coffee and tea, as well as smoking can stain the resin that the dentist uses to do the bonding. Therefore, you need to avoid eating and drinking, or smoking during the first 48 hours after the treatment was done, to avoid staining.